User Manual
Here you will find detailed instructions and helpful tips for the successful application of our products. From vertical and downward-facing drill holes to material separation and splitting, as well as rock excavation and demolition – we guide you step by step through the process. Our experts are always available to answer your questions and offer tailored solutions for your specific project. Feel free to contact us and send us photos along with a description of your plan. Together, we will find the optimal solution for your success!
Work Process BETONAMIT® Standard (liquid)
For vertical and downward-facing drill holes
- First, drill holes with a diameter of 30-40 mm. The optimal hole spacing is 10 times the hole diameter, so about 30-40 cm. The holes should be as clean and dry as possible.
- Fill the BETONAMIT® powder into the mixing container. Then add 1.0 to a maximum of 1.2 liters of cold, clean water per 5 kilograms of powder. Mix the components with an electric stirrer until a flowable, homogeneous mixture is formed.
- Pour the mixture directly from the mixing container into the drilled holes.
- The total processing time should not exceed 5 minutes.
- No additional mechanical sealing is required.
- For special applications of BETONAMIT® with hole diameters over 40 mm, prior consultation with the manufacturer is mandatory.


Positioning of Drill Holes
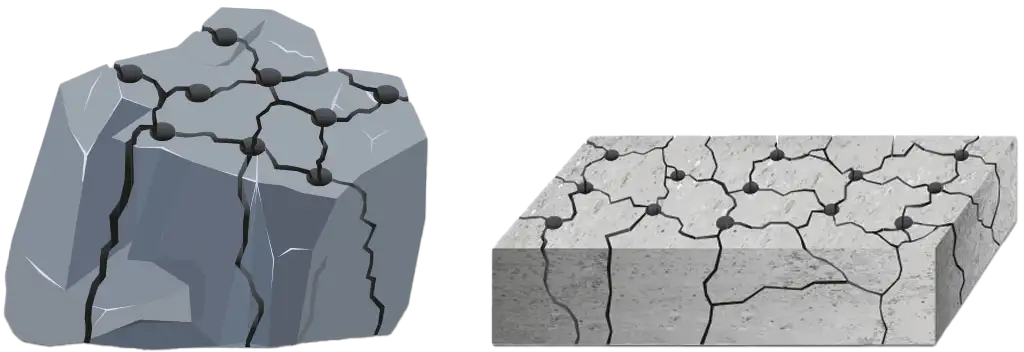
Crack formation always follows the path of least resistance. A larger hole diameter results in more force, shorter reaction time, and wider cracking. Closer hole spacing creates smaller fragments and leads to a faster reaction.
The holes are drilled with a small distance in a line. This results in crack formation from hole to hole. This way, objects can be relatively precisely separated or split during blasting operations.

To achieve the smallest possible fragments, the holes are drilled in several staggered rows. As the number of holes increases, the resulting fragments become smaller. The cracks form crosswise through the material.

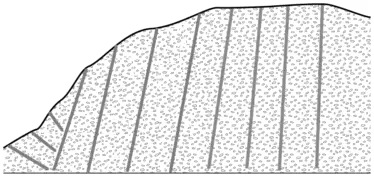
For rock excavation or demolition, there are various techniques. The drilling pattern is selected according to the shape and properties of the rock or adapted to local regulations. The principle remains the same: first, a free side, meaning a straight edge, is created. From this edge, excavation can be continued as far as necessary.

We understand that every project is unique and brings individual challenges. Therefore, we want to ensure that you always receive the best possible support when using BETONAMIT®. If you have any questions or would like to present your specific demolition project to us, please do not hesitate to contact us. You can send us photos and a description of your project at any time. Our experienced team is happy to assist you with tailored solutions and support you on your way to a successful project completion.
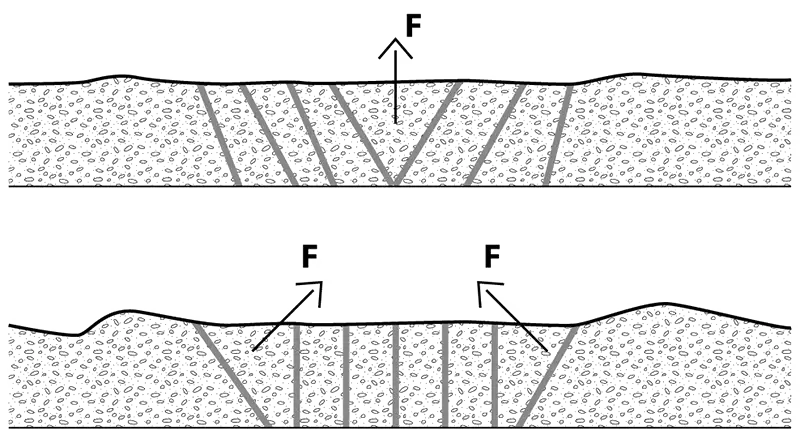
If there is no free space available for material displacement, space must first be created. This can be done either through opposite drilling at an angle of 50-60° or unilaterally at an angle of 40-50°. Angle drilling is also suitable for creating large-scale lowering of the ground level, for example when working in basements.

In rock excavation, the holes are drilled in several rows 10-15 cm below the required ground level and filled. This breaks and loosens the substrate, making it possible to remove it with an excavator or sometimes manually. Again, the expansion agent works most effectively when the holes are slightly slanted, so part of the force acts upwards.

The use of BETONAMIT® in quarries is becoming increasingly important. Regulations for the use and storage of explosive materials are no longer feasible in many countries, leading to a growing search for alternatives. The optimal application in these areas depends greatly on the local conditions and the material to be blasted. We are happy to work with you to develop a solution tailored to your needs. (e.g. marble excavation, granite extraction, etc.)

Calculation of Material Consumption
The material consumption is calculated by multiplying the sum of the depths of all drill holes by the corresponding factor (according to the table) of the drill hole diameter used.
The table contains the factors in the most common weight and length units used in the construction industry, as well as in combination.
Example Calculation:
You have 15 drill holes with a diameter of 35 mm and a depth of 0.60 meters. The factor = 1.6 kg. Calculate 15 x 0.60 meters x 1.6 kg = 14.4 kg of BETONAMIT®.

Technical Specifications
The following table shows the expected reaction time depending on the temperature. Additionally, you will find other helpful information regarding the application. Since the drill hole diameter significantly affects the expansion force and reaction time, we recommend selecting the largest possible drill bit whenever possible.
| Temperature | 5° C | 10° C | 15° C | 20° C | 25° C | 30° C | 35° C |
|---|---|---|---|---|---|---|---|
| Recommended Borehole Diameter | 30 - 40 mm | 30 - 40 mm | 30 - 40 mm | 30 - 40 mm | 30 - 40 mm | 30 - 40 mm | 30 - 40 mm |
| Minimum Borehole Depth | 5 x Drill Ø | 5 x Drill Ø | 5 x Drill Ø | 5 x Drill Ø | 5 x Drill Ø | 5 x Drill Ø | 5 x Drill Ø |
| Maximum Borehole Depth | 6 m | 6 m | 6 m | 6 m | 6 m | 6 m | 6 m |
| Recommended Borehole Spacing | 10 x Drill Ø | 10 x Drill Ø | 10 x Drill Ø | 10 x Drill Ø | 10 x Drill Ø | 10 x Drill Ø | 10 x Drill Ø |
| Water Amount per 5 kg | 1.0 - 1.2 l | 1.0 - 1.2 l | 1.0 - 1.2 l | 1.0 - 1.2 l | 1.0 - 1.2 l | 1.0 - 1.2 l | 1.0 - 1.2 l |
| Break Time | 12 - 72 hrs | 12 - 60 hrs | 12 - 48 hrs | 6 - 48 hrs | 6 - 36 hrs | 4 - 24 hrs | 2 - 12 hrs |
 BETONAMIT® expands further over several days. This means that the more time you allow BETONAMIT to work, the easier the subsequent removal of the broken pieces becomes. So, be patient and let BETONAMIT® do the hard work for you.
 German
 French